|
|
| This is a non-commercial web site. Advertising is not accepted. I am not being paid for any mention or promotion. |
| To translate this page from English select a language |
 happiness |
808
Car Keys Micro Camera Review hope it can help your life safe and happiness |
happiness |
MD-80 Camera |
| The MD-80 camera electronics are similar to the 808 car keys micro camera. I don't review the MD-80. There might be many versions. Some are similar to the 808 #3. I get some email tips and I pass them along here. Please don't ask me questions about the MD-80. I don't have one. |
| 140108 - Report - MD80 like the 808 #19 | ||
| Franco
from Italy sent me this information about his MD80 with
electronics like the 808 #19. ---------------------------- I bought a MD80 Mini DV camera from eBay. Searching on Internet I found your site that it seems to me the best on information about this class of cheap cameras. So I write to you just to share my findings. Looking in your table of 808 cameras, it seems a #19 model. Attached is a frame taken from video that shows the time that is very close, if not the same, as show as #19. The time set is identical. The AVI looks like in your description. I was able to import in virtualdub using commands File Open and choosing Direct Show as format (I have the plugin). If you open normally you obtain black frames and virtualdub doesn't play it, like you described. Audio is like your description, noisy whit a slow card, without noise with a faster card. I opened it to see the internals. Processor is labeled A618323.1 1223 instead of A616408.1 1225 that is described in your #19 page. I found in Russian forum (http://www.taker.im) other similar processors like A618321.1, A625853.1 for the same camera. I was unable to understand who is the producer. Google and Bing where not my friends, maybe I have to use a Chinese search engine. USB give me this USB\VID_1908&PID_3281&REV_0100&MI_02, in USB.IDS i found that 1908 is GEMBIRD that has only one PID, 1320. So no usable information from it. There is only one crystal but RTC works also when the camera is off. The SPI flash is a eight pin Winbond 25Q40B the mcu is:
The image/video
captured from CMOS sensor is optimized by the image signal
processing features of the AX3231 such as auto exposure, white
balance, defect pixel detection and cancellation: configurable
noise reduction, image sharpness enhancement, color correction,
brightness, contrast, color saturation and hue.
AX3231 contains an
internal hardware image acceleration engine which provides image
manipulation functions like rotation, mirroring, virtual
display, picture-in-picture with overlay, zoom in/out.
Rapid application
development is supported by a complete development toolkit which
includes a GCC compiler and a GDB debugger with on-line
debugging through JTAG and USB.
The high
integration and performance of this digital video SoC solution
enables popular consumer products such as drive recorders, baby
monitors, wireless cameras, surveillance cameras, web cameras,
and digital video recorders.
Specification
Max Speed
(MIPS): 96
Program ROM
(Byte): External SPI Flash
RAM (Byte): 96K
GPIO: 112
ADC: 8 ch 10-bit
DAC: 16-bit Stereo
USB: 2.0 H.S. Dev
(4 EP)
Timer: 4 x 16-bit
UART: 1
SPI: 2
I2S: N
PWM: Y
DSP Engine: 16-bit
DSP Engine
SD/MMC
Interface: SDHC 2.0
IO
Voltage: 3.0V-3.6V
Oper. Temp
(°C): -40/85
Special
Feature: CSI, MJPEG Codec, IRTC, AGC, MIC AMP, LCD Interface
Package: LQFP128
Tools: ADS, EVK
Remarks: Preliminary the site is:http://www.appotech.com/dp/product/ax3231 |
||
| MD80 720p 60FPS - JoyHonest |
|
131104 - The camera producer sent me a 3.36 second sample video
in outdoor light, taken with a class 4 SanDisk card. This
camera is still in development so a delivered cameras might be
different. Summary - The video is AVI, MJPG, 1280x720 at 60FPS and the missing frame rate of the sample video is about 8%. It has an AVI data rate of about 5.5 MBps. The audio is PCM 352.8Kbps, 22050Hz,16 bit. Comment - A data stream of 5.5 MBps is extremely high. Some class 4 cards will not write that fast. The producer needs to clearly specify what the minimum requirements are for quality video. 131027 - Joyhonest is producing an MD80 with 720p 60FPS video based on the 5MP OmniVision OV5640 image sensor . Release data is TBD. "The OV5640 delivers a complete 5-megapixel camera solution on a single chip". This is the first micro camera that I know of that has 5 megasensels, 4:3, 2624 x 1956. The width of the image array is used, and scaled down to 720p video. It also does embedded JPEG (MJPEG) compression in hardware. FEATURES: 5.0 mega pixels high resolution. Support PC camera and chatting function. Voice control function, more than 60db begin. Support AVI video format. It can carry out high definition image recording under low illumination. Support Sound control video and Take video when charging. Support 60 fps for 1280*720 video shoot and output. Mobile U disk and Card Reader function. Support MAX 32GB T-flash card. Built-in Li rechargeable battery lasting for about 60 minutes. Color: black. |
| 130821 - MD-80 like the 808 #19 | |
| Roberto from Italy
sent me this information about an MD-80 that is electronically
like an 808 #19. Corrupt AVI - The camera produces a corrupt AVI file. It plays in some players. It loads into VirtualDub but does not display. Avidemux can be used to partially clean up the AVI file but not un-corrupt it. The missing frame rate is about 33%. A sample AVI file (10.1MB) is in the MD80 folder of the vault. |
|
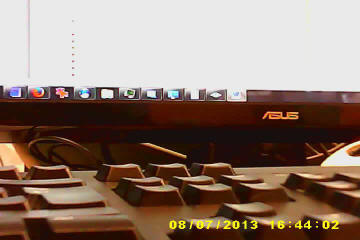 MD-80 like 808 #19, 720x480 frame grab 1/2 scale Looking in your table of 808 cameras, it seems a #19 model. Attached is a frame taken from video that shows the time that is very close, if not the same, as show as #19. The time set is identical. The AVI looks like in your description. I was able to import in virtualdub using commands File Open and choosing Direct Show as format (I have the plugin). If you open normally you obtain black frames and virtualdub doesn't play it, like you described. Audio is like your description, noisy whit a slow card, without noise with a faster card. I opened it to see the internals. Processor is labeled A618323.1 1223 instead of A616408.1 1225 that is described in your #19 page. I found in Russian forum (http://www.taker.im) other similar processors like A618321.1, A625853.1 for the same camera. I was unable to understand who is the producer. Google and Bing where not my friends, maybe I have to use a Chinese search engine. USB give me this USB\VID_1908&PID_3281&REV_0100&MI_02, in USB.IDS i found that 1908 is GEMBIRD that has only one PID, 1320. So no usable information from it. It installed in windows 7 64 bit downloading drivers from Microsoft. Drivers are universal and made by Microsoft so I can't have any information from them. There is only one crystal but RTC works also when the camera is off. The SPI flash is a eight pin Winbond 25Q40BVSIP 1233. Strange, it seems a 4kbit (512 bytes) flash. It is a 4Mb (512K byte) SPI flash. |
|
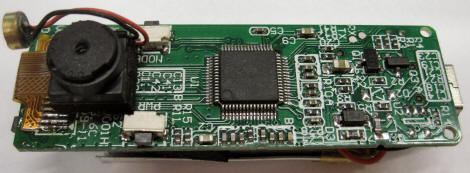 MD-80. Camera module on soldered flat cable. Processor. Microphone. |
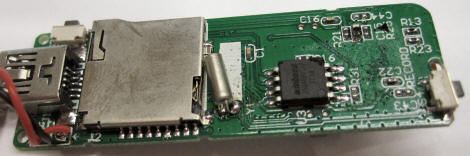 MD-80. SD flash socket. Crystal. 512 KB SPI flash chip, usually firmware dumped into RAM at power-up. |
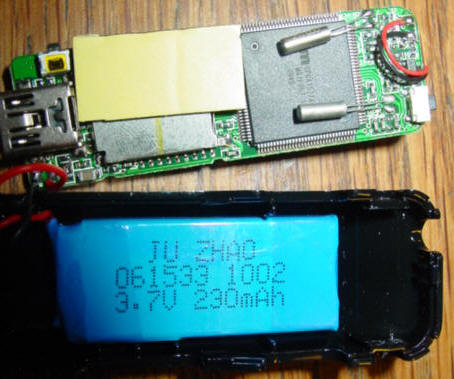
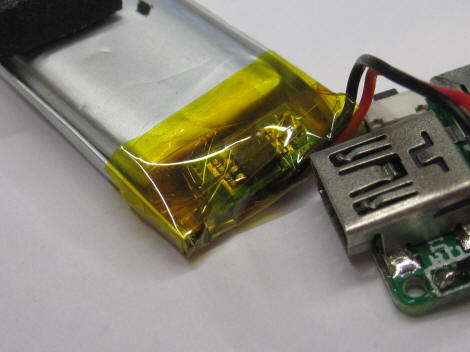 MD-80. Battery module showing protection circuit. |
|
| MD80Schematic |
| 111113 - MD80 Schematic |
| A person in Ukraine
sent me this
PDF (170K)
schematic of the MD80. It is probably similar to the
808 #3. It might be useful to someone who is modifying the
camera. In the
vault in the
MD80 folder: MD80_3_2.4.Sch.pdf http://adv-md80.at.ua/ is a Ukraine forum (Russian, so you might need Google Translate) about modifications to the firmware of the micro cameras (MD80, 808, ...) that use the Sunplus SPCA1527A and SPCA1528 processors. OV7670_MN is the camera module 24 pin connector. SPCA1527A is the processor. K4S641632K is the 8 megabyte (64 megabit) SDRAM. 16 data lines and 12 address lines. W25X80 is the 1 megabyte (8 megabit) serial (SPI) flash memory where the firmware is stored. 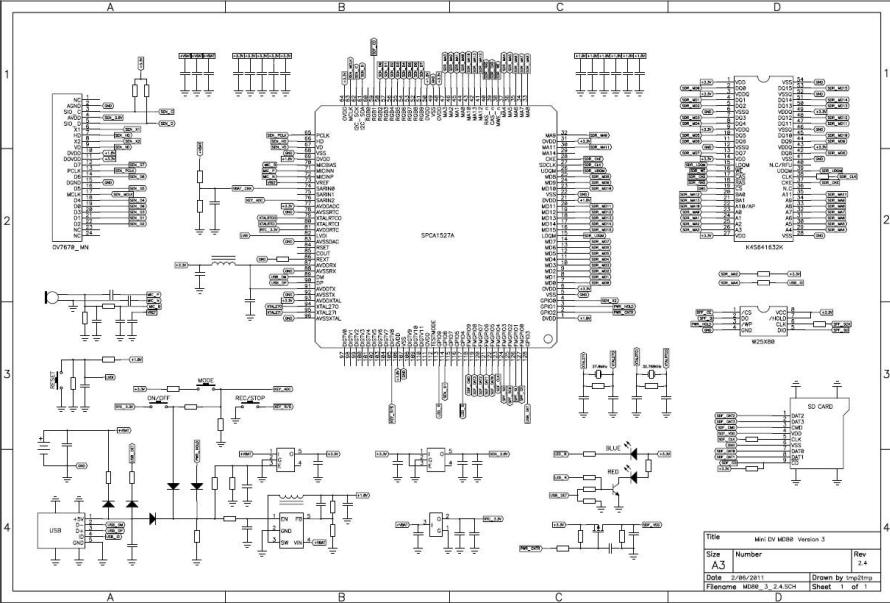 |
| MD80ExternalBatteryMod | |
| 110928 - MD80 External Battery Mod | |
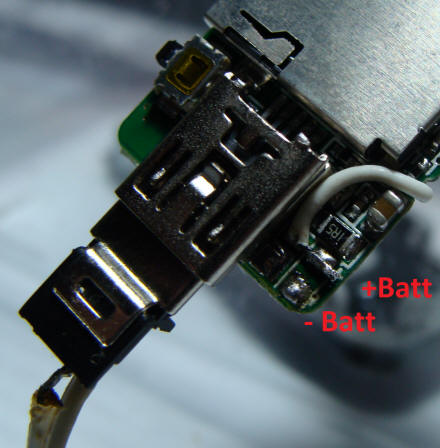
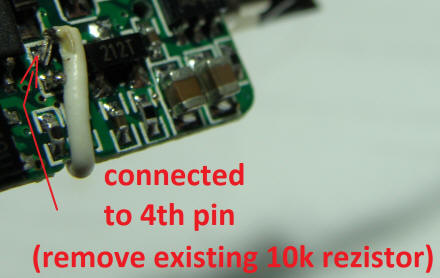
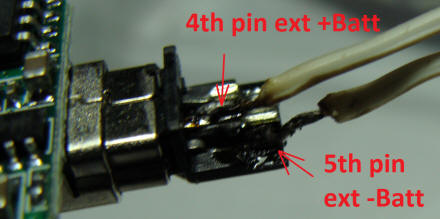
|
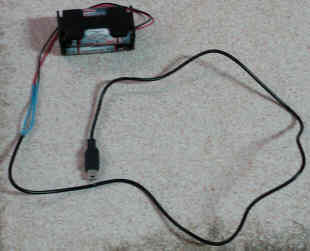
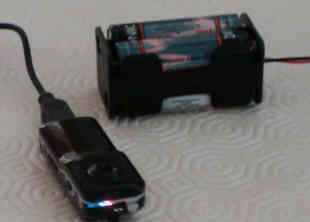
CAUTION - DO THIS MODIFICATION AT YOUR OWN RISK. A LiPo battery can explode,
cause a fire or cause personal injury if not used correctly.
A monitored bench test must be done, The test must go
through a full charge and
discharge cycle to insure that the modification is safe.
Any replacement battery must have a protection circuit. Sasha created this mod to an MD80 to replace the internal LiPo battery with a larger external LiPo. Before the mod, the internal battery is connected to ground and +bat on the circuit board. The internal battery was removed. The 10K resistor was removed (see photo) and a wire was soldered from +bat on the circuit board to pin4 (ID pin) of the internal mini USB. A mini USB cable was modified to support the external battery. The type A (4 pin) connector was removed from the cable. The external LiPo battery red positive lead is connected to pin 4 (unused ID pin) and the black negative battery lead is connected to pin 5 (ground) of the cable mini USB connector. The camera is powered by the modified cable and external battery. Whenever this cable is removed, the camera date time defaults and needs to be set again. To set the date time connect the modified cable then insert a flash card that has a date time file on it. Power the camera off and on. To connect the camera to a computer use a normal mini USB cable. The camera will be powered from the power on the USB cable. |
|
 |
 |
 |
|
| 110731MD80 |
| 110731 - MD80 Anonymousie Comments |
Anonymousie in Russia reports the following about his MD80.I have a MD80 clone (#3 camera), and I have a few things about it that I would like to share: - It has a mode (which stays on until you turn the camera off) where you can record while it's plugged into USB (computer, charger, battery pack)--just hold down the record button while powering the camera on (with either power button, or plugging USB in). - I happened to brick mine while trying to get the camera to upgrade its firmware from the microSD card (because I use Linux, and I don't know of any firmware upgrade tools for Linux...). The lights were off, all the buttons did nothing, and it was not detected by the computer anymore. I managed to get it detected again by pressing the reset button while shorting the 2 pins of the spi flash chip (the ones nearest the USB port). I then somehow got the ISP bootstrap (or whatever it is) loaded and running on the camera, but don't know what to do after that to reload the correct firmware. Time to look for a Windows computer :( Here's the webcam/programming mode dmesg output before the bricking: USB 1-7: new high speed USB device number 60 using ehci_hcd Linux media interface: v0.10 Linux video capture interface: v2.00 gspca: v2.12.0 registered gspca: probing 04fc:1528 spca1528: Omnivision 3.1M Sunplus CA1528 gspca: video0 created usbcore: registered new interface driver spca1528 And here's the dmesg output after the reset with my method: USB 5-1: new full speed USB device number 53 using uhci_hcd Linux video capture interface: v2.00 gspca: v2.12.0 registered gspca: probing 04fc:1528 spca1528: �A�p8U"��>����r�i��0�%R�^�Z�i��0�%R�^�Z� gspca: video0 created usbcore: registered new interface driver spca1528 In Linux, the webcam driver is not needed to program the camera. By the way, the Russians have figured out a way to make this camera do loop recording as well as autostart and other neat features/hacks. They have also figured out a way to put the camera into programming mode via the usb port (the 5th pin that is normally unused on other devices). |
| MD80TimestampRemoval |
| 110210 - MD80 Timestamp Removal and Firmware Swap |
| Bob (BobFlyman
on YouTube) in Brixham Devon England has an MD80 camera. The
electronics are almost identical to the
808 #3.
Using the 808 #3 methods, he removed the timestamp from the
firmware. His comments: I downloaded the 1528.bin.raw file from the MD80 and found it to be exactly same size (1696 kb's) as in the type #3 808. Plus 'verify' worked in ISP. I took a gamble and tried the files for 808 date time stamp removal (in your 30 October 2010 post) on the MD80. Success. Date stamp removed. Process worked exactly as described in the videos linked.
Function now - Red and blue
operation lights now work differently and it behave more
like the 808. The blue is on when powered up. Short press
of 'record' makes a jpeg and long press, results in 3 blue
light flashes and it's in record mode. One short press stops
record mode. It no longer works sound activated mode. The
'mode' switch no longer switches the camera to webcam
mode. Red light has no function. The jpeg's have a blacked
out area where the time stamp should be, as is the case with
the 808.
I have yet to test all 5 of cameras to see how the frame
rate is
now, but short tests seem to indicate it's ok.
|
| 110526 - MD80 Firmware | ||
|
Angelo from Italy contributed this MD80 firmware. See the
808 #3 page for
instructions about installing firmware. Use at your own
risk. The attachments are MD80 firmware, seems to be a #3 clone, extracted from my cam, one is the original and the other is NoTimeStamp, tested on my cam. In the MD80 folder - MD80.7D4FF80C.ORIGINAL.rar MD80.7D4FF80C.NOTIMESTAMP.rar |
||
| 110418 - MD-80 Photos |
| Christian in Germany provided these
MD-80 tear-down photos. Here are some pictures of the Mini DV80 that I bought on ebay. Video files are saved as SUNP0001.AVI and a multi-language manual that also describes the sound triggering function can be found here: http://www.playdeluxe.de/bilder/Bedienungsanleitungen/minidv-md80_usermanual.pdf Although I don't know if it is sound or motion triggered as the manual on the driver CD (which I had to translate via Google translator into English) says it is a motion trigger while the above link that I found on the internet describes a sound trigger. 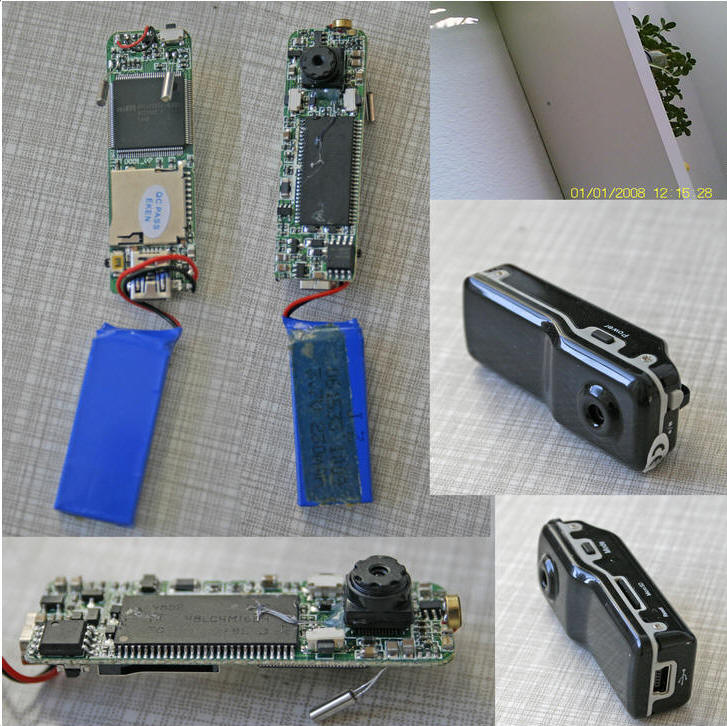 |
| 110315 - Buyer Report |
| 110302 Jurgen from The Netherlands received an MD-80 camera today from: kkwfvp. $10.50. "Has blue/red led (no yellow) and records in MJPEG. Use it wit Optoma 4GB Class 4 microSD. Battery gets a bit warm. I think it's (like) a 3. Motion isn't that good and it looks a bit telephoto." |
| 110119 - MD-80 PIC Micro Mod |
| Here is a link to an MD-80
mod to control the buttons with a PIC micro (Spanish). http://www.sistemasorp.es/2010/12/22/interactuar-con-la-videocamara-md80-y-un-microcontrolador/ |
| 2010 Sep 08 - MD-80 PIC Micro Mod - Optical Sensor Starts and Stops Recording |
| Anix in
Russia sent me this MD-80 PIC12F629 mod. It uses an
optical sensor to start recording in the light, and stop
recording in the dark. Opto couplers are used to control
the camera buttons. |
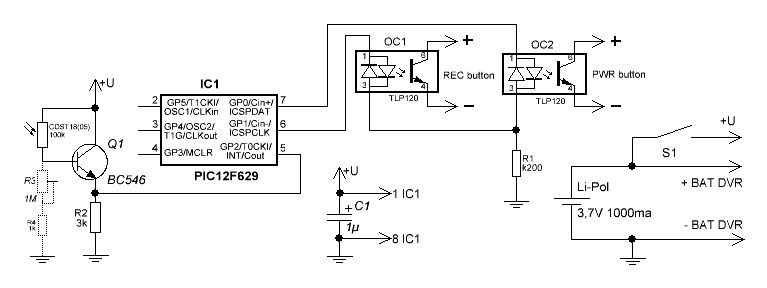 MD-80 PIC Micro Mod Schematic |
| Title:
Photorelay for MD-80 DVR control. Autor: Anix Date: 09.09.2010 ReadMe.txt - this file PIC firmare - photorelay.bin MD80/100908 MD80 Mod photorelay.bin (2046 bytes) Shematic circuit - photorelay.jpg My MD-80 DVR can start record 2 minute video at sound detection. If background noises in this place, many fault detections appears. For surveillance in seldom visited place, for instance storehouse I make the small device, which start the camera recording, when the light-on and switches off if dark. The Photorelay is assembled on PIC12F629 and several components. Also I have connected external more powerful Li-Pol battery for feeding the camera and photorelay. PIC output are connected to button PWR and REC through optocouplers TLP120. Optocouplers has miniflat formfactor and placed inside DVR case with smd resistor 200 Ohm. Internal battery was disconnected and removed. For correct connection optocouplers to buttons, measure the polarity of the voltage on them. 4 wires with minijack, connect DVR with photorelay and external battery (+U, GND, PWR, REC). Also You can use these wires for remote control of DVR, just connect few at a time PWR or REC wire to +U wire, for pushing corresponding button. DVR buttons also work. Photorezistor CDST18 or CDST05 used as light detector. You can use any photoresistor with dark resistance 100kOhm and light resistance 5 kOhm. Also You can use Phototransistor or Photodiod, but I don't recommend, since its Infrared sensitive devices, and do not working if You use florescent lamps. Use it only if sunlight or bulb lamp used for illumination. This detector very sensitive, to reduce his sensitivity, connect between base of the transistor and GND variable resistor about 1 Mohm and adjust sensitivity level. Before power-up of photorelay, make sure that DVR is switching-off. The Algorithm of the work: - At power-up with switch S1, microcontroller push button REC and waits 32 seconds. (This is made to in the event of hovering the controller, he was able when initializing to stop recording and DVR itself was switched off. If DVR is switched-off this does not render on it influences but gives You possibility to come out of room and switch off light). - Microcontroller start light detection procedure. If light-on, microcontroller push PWR button and after 1,7 sec push REC button. This delay need for initialization DVR after power-on. - If light-off, microcontroller push REC button and after 3,5 sec push PWR button. This delay need for resume recording and SD card writing processes. Photorelay current consumption in "light" mode around 1ma, in "dark" mode around 0.25ma, then buttons pushed 15ma. ReadMe.txt - this file PIC firmware - photorelay.bin Photorelay circuit - photorelay.jpg Configuration bits for PIC controller: 01- 000 - 1 - 1 - 0 - 0 - 0 - 1 - 100 - CP_OFF - CPD_OFF - BODEN_OFF - MCLRE_OFF - PWRTE_ON - WDT_ON - INTRC_OSC_NOCLKOUT |
| MD-80 LINKS |
|
MD-80 Camera in Word Format (200 KB) - SunPlus Manual MINI DV D001 Manual (327K) - Another MD-80 manual Using a wide angle lens MD-80 CameraClone Date Time Removal tag.txt file for MD-80 |
| MD-80 Tear Down |
2010 March 19 - Photos from Johan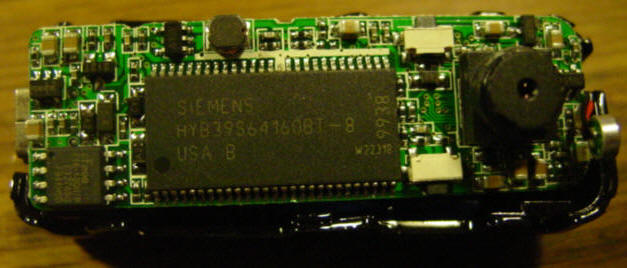
 |
| MD-80 TIPS |
|
2010 Apr 30 - Mick's tip about
external power through the mini USB connector
I am using one of the cheap MD-80 clones from JOYMYFUN and have found a way to plug in and run an external battery supply. I have tried a single AA battery mobile phone charger and a 2 battery AA phone charger. I can even record while powering from USB and AC.
The trick to it is so simple.
Firstly, with the camera powered off,
press and hold the record button in.
Next, insert the
power supply into the
mini USB port
in the camera.
Keep holding the record button in while
the blue L.E.D comes on and the red L.E.D. flashes a bit.
When the blue L.E.D. in stationary and
red L.E.D. is off, you are ready to go.
So simple and this has revolutionized
the way I use this camera now.
|
| 2010 XXX XX - XXXXXXXX | |

This work by Charles E Lohr is licensed under a Creative Commons Attribution-ShareAlike 3.0 Unported License. Google Analytics javascript is used on this page. Google Analytics Google Analytics IIS 6.0 There is no politically correct content on this web site. I have never owned an SUV. |